
Easy crochet lacy coaster / Free pattern
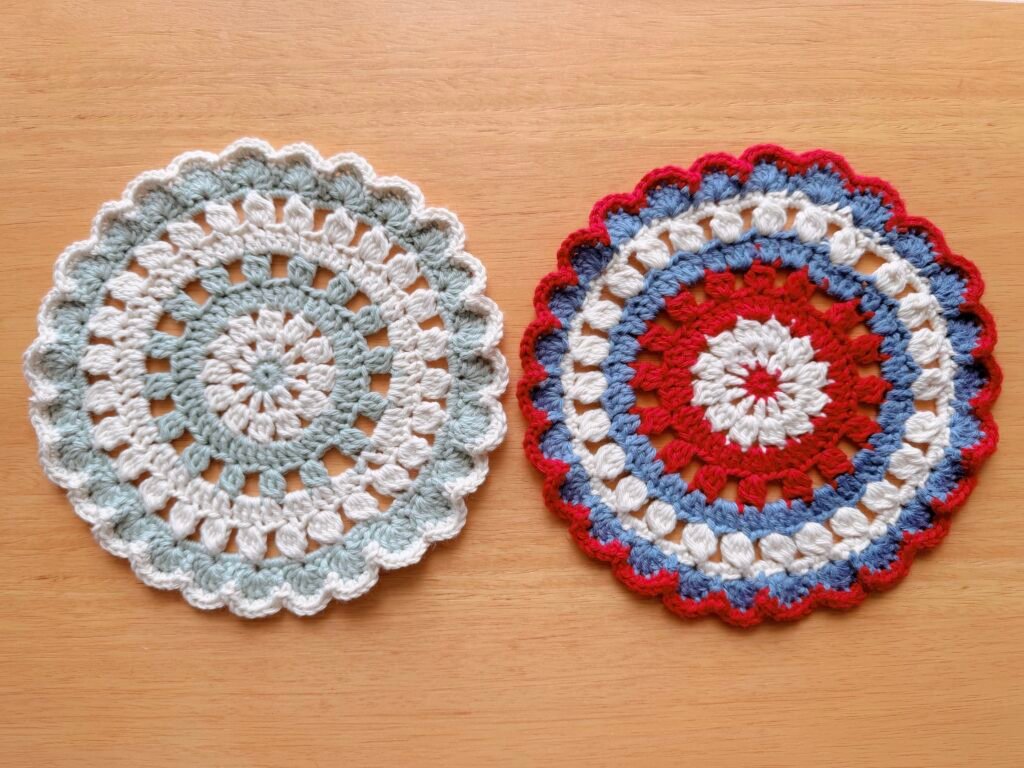
This round crochet coaster features a lacy design with a scalloped edge and beautiful color changes! Its diameter is about 9.5 inches / 24 cm. It’s quick to make, easy to customize, and perfect for adding a handmade touch to your home or gifting to someone special. I hope you enjoy this pattern  Material Yarn – 100% cotton yarn (I used I love this Cotton yarn – Medium weight 4) Crochet hook – 5 mm Crochet needle Scissors Abbreviations MR – Magic Ring SC – Single Crochet DC – Double Crochet DC Inc – Double Crochet increase DC cluster – Double Crochet cluster Ch – chain Slst – Slip Stitch St – Stitch R – Round Pattern note *This pattern uses US crochet terms *Always Ch 1 before moving onto the next round Color changes Version 1 – White, Red, Blue (American flag color) Version 2 – Blue, White Pattern R 1 : Version 1 : Red, Version 2 : Blue MR 12 SC R 2 : Version 1, 2 : White Ch 4 (3rd ch is going to be the first stitch), (DC, ch 1) x 11, R 3 : Version 1, 2 : White Slst into chain space, ch 2(NOT count as DC), (3 DC cluster into chain space, ch 2) x 12 R 4 : Version 1 : Red, Version 2 : Blue Ch 2(Count as a DC), DC, DC Inc into chain space, (DC Inc, DC Inc into chain space) x 11 R 5 : Version 1 : Red, Version 2 : Blue Ch 2(NOT count as a DC), (3 DC cluster, ch 3, skip 2 st) x 12 R 6 : Version 1 : Blue, Version 2 : White Ch 2(Count as a DC), DC, 3 DC into chain space, (DC Inc, 3 DC into chain space) x 15 R 7 : Version 1 : White, Version 2 : White Ch 2(Count as a DC), 4 DC cluster(Count this as a first stitch on this row), 3 ch, skip 2 st, (5 DC cluster, 3 ch, skip 2 st) x 25, 5 DC cluster, 3 ch, skip 1 st R 8 : Version 1 : White, Version 2 : Blue Ch 1(NOT count as a SC), (SC, 3 SC into chain space) x 27 R 9 : Version 1, 2 : Blue (Skip 1 st, 6 DC into 1 st, Skip 1 st, Slst) x 27 R 10 : Version 1 : Red, Version 2 : White Ch 1(NOT count as a SC) [2 SC, SC Inc x 2, 2 SC, Skip Slst] x 26 Done! Great job
Flapjack Octopus – Free pattern
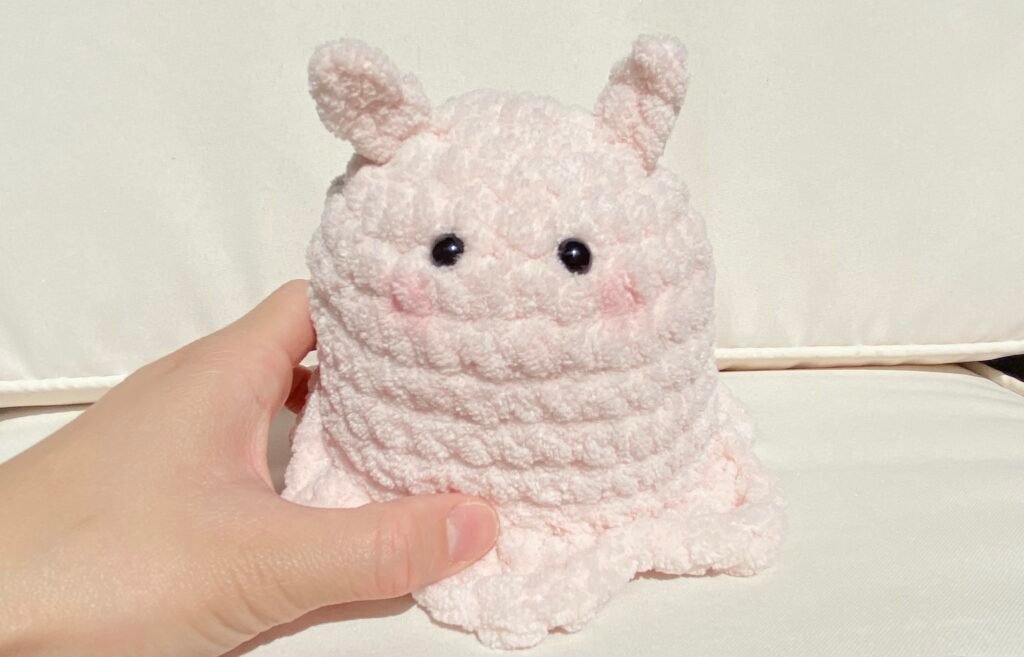
This is a very very easy flapjack amigurumi pattern! It is very easy but it turns out so cute. I hope you enjoy the pattern. Materials -Crochet hook (9 mm) -Super bulky yarn (I used BERNAT blanket yarn) -Stuffing -Sewing needle -Stitch Marker (If you need) -6 mm safety eyes Abbreviation -MR : Magic Ring -R : Row -Sc : Single crochet -Inc : Increase -FLO : Front Loop Only -Slst : Slip stitch -hdc : Half Double Crochet -dc : Double crochet -trc : Triple crochet -Dec : Decrease HEAD/BODY MR 7 Sc R 1 : 7 inc R 2 : (Sc, Inc) x 7 (21) R 3 : (2 Sc, Inc) x 7 (28) R 4 : (3 Sc, Inc) x 7 (35) R 5 – R 9 : 35 Sc (35) *Insert safety eyes between row 4 and 5, 3 stitches apart R 10 : FLO (Slst, (hdc, dc) in the same stitch, trc, (dc, hdc) in the same Stitch, Slst) x 7 (49) *I recommend to put a stitch marker in back roop R 11 : BLO (the previous row you worked on Front roop) 35 Sc (35) *Start stuffing and add more as you go along. Please not to stuff too much, otherwise the bottom Part is going to be too big to keep it standing straight* R 12 : (3 Sc, Dec) x 7 (28) R 13 : (2 Sc, Dec) x 7 (21) R 14 : (1 Sc, Dec) x 7 (14) R 15 : 7 Dec (7) Fasten off, Sew the end in EARS Chain 3, turn, skip 1 chain, 2 Sc Fasten off and Leave a long tail for sewing. Sew on row 3, 8 stitches apart. Done!
Double sided crochet totoro bag / pixel art crochet – free pattern

Materials Yarn – 5 bulky yarn (I used Yarn Bee soft and Sleek Chunky yarn)Green, White, (Light) gray, (Dark) gray, Black, Pink Crochet hook – 5 mm Sewing needle Stitch Markers Scissors Abbreviation-Ch : Chain-Sc : Single Crochet-GN : Green-GY : (Light)Gray-WT : White-DGY : Dark Gray-PK : Pink-BK : Black Totoro (GN) Chain 57, turn Row(R) 1 : (GN) Skip first ch, 56sc, Ch1, turn R2-R3 : (GN) 56sc, ch1, turn (*From now on, all you need to do is single crochet, so the pattern shows you only the color and how many single crochet you need to do. *The front loop side of the rows with odd number is going to be on the front side. Make sure to leave all of the ends on the other side) R4: GN21, GY3, GN32, ch1, turn R5: GN17, GY3, GN10, GY6, GN20 , ch1, turn R6: GN19, GY8, GN7, GY6, GN16, ch1, turn R7: GN15, GY23, GN18, ch1, turn R8: GN17, GY25, GN14, ch1, turn R9: GN14, GY25, GN17, ch1, turn R10: GN17, GY25, GN14, ch1, turn R11: GN15, GY25, WT3, GN13, ch1, turn R12: GN12, WT4, GY25, GN15, ch1, turn R13: GN15, GY24, WT6, GN11, Ch1, turn R14: GN10, WT8, GY26, GN12, Ch1, turn R15: GN11, GY5, DGY2, GY19, WT9, GN10, Ch1, turn R16: GN19, WT10, GY18, DGY1, GY2, DGY1, GY4, GN11, Ch1, turn R17: GN12, GY2, DGY1, GY4, DGY1, GY16, WT11, GN9, Ch1, turn R18: GN9, WT12, GY15, DGY1, GY4, DGY1, GY1, GN13, Ch1, turn R19: GN14, DGY1, GY5, DGY1, GY13, WT13, GN9, Ch1, turn R20: GN9, WT13, GY12, DGY1, GY6, DGY1, GN14, Ch1, turn R21: GN14, DGY1, GY7, DGY1, GY11, WT13, GN9, Ch1, turn R22: GN9, WT13, GY10, DGY1, GY8, DGY1, GN14, Ch1, turn R23: GN14, DGY1, GY9, DGY1, GY10, WT1, GY1, WT1, GY1, WT8, GN9, Ch1, turn R24: GN10, WT2, GY1, WT2, GY1, WT2, GY1, WT2, GY9, DGY1, GY10, DGY1, GN14, Ch1, turn R25: GN15, DGY1, GY19, WT6, GY2, WT3, GN10, Ch1, turn R26: GN10, WT5, GY1, WT2, GY1, WT1, GY20, DGY1, GN15, Ch1, turn R27: GN15, DGY1, GY21, WT1, GY2, WT2, GY2, WT1, GN11, Ch1, turn R28: GN12, WT6, GY21, DGY1, GN16, Ch1, turn R29: GN16, DGY1, GY22, WT4, GN13, Ch1, turn R30: GN14, GY24, DGY1, GN17, Ch1, turn R31: GN17, GY1, DGY1, GY22, GN15, Ch1, turn R32: GN14, BK1, GY21, DGY1, GY2, GN17, Ch1, turn R33: GN18, GY16, PK2, GY6, GN14, Ch1, turn R34: GN14, GY5, PK4, GY1, BK3, GY11, GN18, Ch1, turn R35: GN18, GY16, PK2, GY6, GN14, Ch1, turn R36: GN14, BK2, GY3, WT3, GY2, BK3, GY11, GN18, Ch1, turn R37: GN19, GY15, WT2, BK1, GY3, BK2, GN14, Ch1, turn R38: GN17, GY3, WT2, GY15, GN19, Ch1, turn R39: GN20, GY19, GN17, Ch1, turn R40: GN17, GY19, GN20, Ch1, turn R41: GN21, GY17, GN18, Ch1, turn R42: GN19, GY15, GN22, Ch1, turn R43: GN23, GY13, GN20, Ch1, turn R44: GN26, GY3, GN2, GY3, GN22, Ch1, turn R45: GN21, GY10, GN25, Ch1, turn R46: GN25, GY10, GN21, Ch1, turn R47: GN21, GY4, GN1, GY4, GN26, Ch1, turn R48: GN27, GY3, GN2, GY3, GN21, Ch1, turn R49: GN21, GY2, GN3, GY2, GN28, Ch1, turn R50: GN29, GY1, GN4, GY1, GN21, Ch1, turnR51-52: ch1, 56sc, turn, Ch1, turnR53 : 56scLeave the end to assemble(I left about 60 inches) Mini Totoro Chain 57 R1: skip first ch, 56sc, Ch1, turn R2-6: 56sc, Ch1, turn R7: GN16, WT24, GN16, Ch1, turn R8: GN15, WT26, GN15, Ch1, turn R9: GN14, WT28, GN14 R10: GN13, WT30, GN13 R11-R12: GN12, WT32, GN12, Ch1, turn R13-R14: GN11, WT34, GN11, Ch1, turn R15-R16: GN10, WT36, GN10, Ch1, turn R17-R19: GN9, WT38, GN9, Ch1, turn R20: GN9, WT2, PK4, WT26, PK4, WT2, GN9, Ch1, turn R21: GN9, WT2, PK4, WT2, BK4, WT14, BK4, WT2, PK4, WT2, GN9, Cn1, turn R22: GN9, WT7, BK1, WT4, BK1, WT12, BK1, WT4, BK1, WT7, GN9,Ch1, turn R23: GN9, WT6, BK1, WT6, BK1, WT10, BK1, WT6, BK1, WT6, GN9, Ch1, turn R24: GN9, WT5, BK1, WT8, BK1, WT8, BK1, WT8, BK1, WT5, GN9,Ch1, turn R25, GN9, WT5, BK1, WT3, BK2, WT3, BK1, WT8, BK1, WT3, BK2, WT3, BK1, WT5, GN9,Ch1, turn R26: GN9, WT5, BK1, WT3, BK2, WT3, BK1, WT8, BK1, WT3, BK2, WT3, BK1, WT5, GN9, Ch1, turn R27: GN9, WT5, BK1, WT8, BK1, WT8, BK1, WT8, BK1, WT5, GN9, Ch1, turn R28: GN10, WT5, BK1, WT6, BK1, WT10, BK1, WT6, BK1, WT5, GN10, Ch1, turn R29: GN10, WT6, BK1, WT4, BK1, WT12, BK1, WT4, BK1, WT6, GN10, Ch1, turn R30: GN11, WT6, BK4, WT14, BK4, WT6, GN11, Ch1, turn R31: GN11, WT34, GN11, Ch1, turn R32: GN12, WT32, GN12, Ch1, turn R33: GN13, WT30, GN13, Ch1, turn R34: GN14, WT28, GN14, Ch1, turn R35: GN13, WT30, GN13, Ch1, turn R36-40: GN13, WT13, GN4, WT13, GN13, Ch1, turn R41-42: GN14, WT11, GN6, WT11, GN14, Ch1, turn R43: GN15, WT9, GN8, WT9, GN15, Ch1, turn R44: GN16, WT7, GN10, WT7, GN16, Ch1, turn R45: GN17, WT5, GN12, WT5, GN17, Ch1, turn R46: GN18, WT3, GN14, WT3, GN18, Ch1, turn R47-52: 56sc, Ch1, turnR53 : 56scLeave the end to assemble (I left about 60 inches) AssembleAssemble 2 panels together. Make sure the same row on both sides of the panels are matching. Bag strap Mark 11th and 16th stitch from both sides on both panels. 6 Sc, ch1, turn. Repeat until the strap reaches the length you want it to be. ( I made 21 inches (About 53.5 cm) long straps.) There is one long strap on both panels at this point. Sew the end of the straps on the other side where you put stitch markers on. Done! Your cute Totoro bag is ready to go on a shopping with you:))
Super easy crochet heart coaster / pixel art crochet – Free pattern+video tutorial
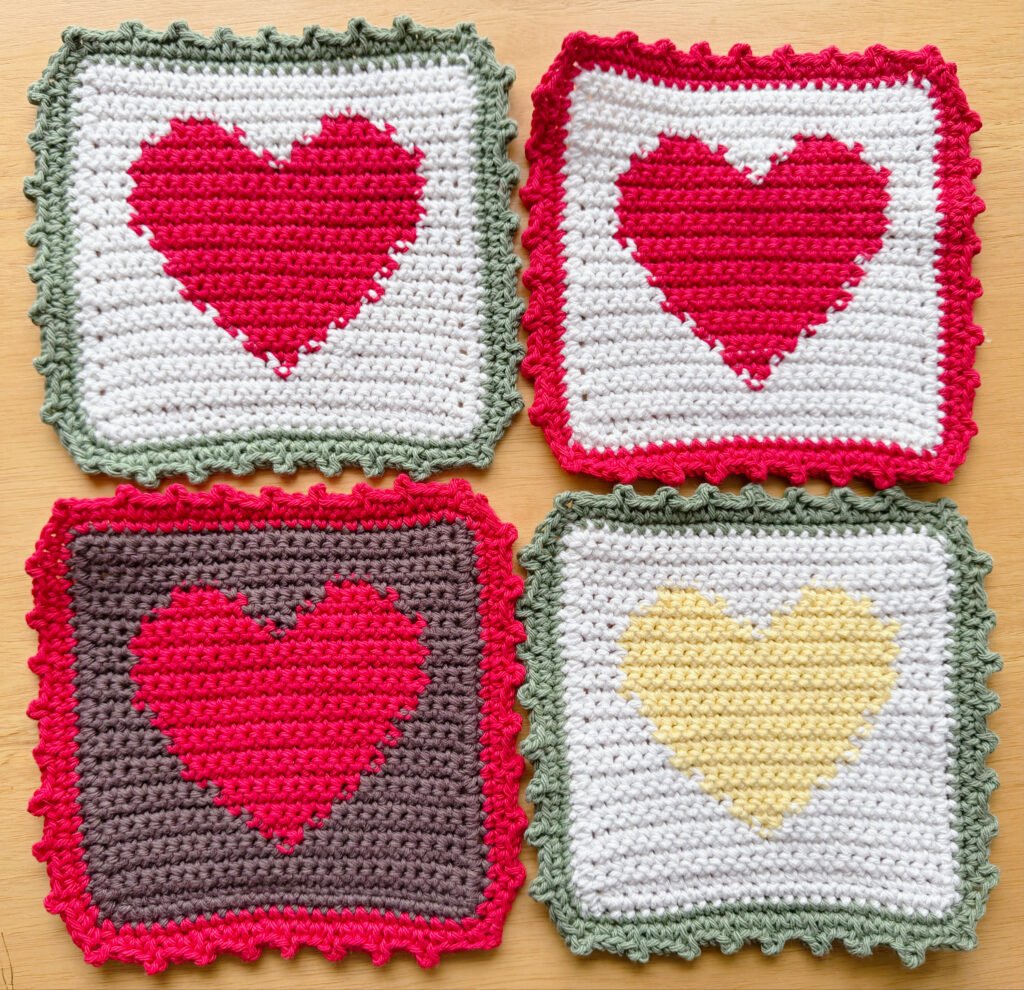
This coaster is 8″ x 7.6″ (20.5 cm x 19.5 cm). It may sound bigger than regular coasters, But It is because I wanted to make a coaster that can keep 2 mugs together! You could also use it for hot dishes, hot pans, or as a kitchen decor I hope you enjoy this pattern! Material Yarn – 100% cotton yarn (I used Lily sugar ‘n cream : Medium weight (4) yarn Crochet hook – 5 mm Crochet needle Scissors Abbreviations SC – Single Crochet Ch – chain Slst – Slip Stitch St – Stitch W – White R – Red *This pattern uses US crochet terms Pattern (W) 26 Ch, turn R1: Skip 1 Ch, (W)25 SC, Ch 1, turn R2-3: Skip 1 Ch, (W)25 SC, Ch 1, turn R4: Skip 1 Ch, (W)12 SC, (R)1 SC, (W)12 SC, Ch 1, turn *Keep all ends on the front loop side R5: Skip 1 Ch, (W)11 SC, (R)3 SC, (W)11 SC, Ch 1, turn *Keep all ends on the back loop side R6: Skip 1 Ch, (W)10 SC, (R)5 SC, (W)10 SC, Ch 1, turn *Keep all ends on the front loop side R7: Skip 1 Ch, (W)9 SC, (R)7 SC, (W)9 SC, Ch 1, turn *Keep all ends on the back loop side R8: Skip 1 Ch, (W)8 SC, (R)9 SC, (W)8 SC, Ch 1, turn *Keep all ends on the front loop side R9: Skip 1 Ch 1, (W)7 SC, (R)11 SC, (W)7 SC, Ch 1, turn *Keep all ends on the back loop side R10-R11: Skip 1 Ch, (W)6 SC, (R)13 SC, (W)6 SC, Ch 1, turn *Keep all ends on the front loop side R12-R13: Skip 1 Ch, (W)5 SC, (R)15 SC, (W)5 SC, Ch1, turn *Keep all ends on the back loop side R14: Skip 1 Ch, (W)4SC, (R)17SC, (W)4 SC, Ch 1, turn *Keep all ends on the front loop side R15-R19: Skip 1 Ch, (W)3 SC, (R)19 SC, (W)3 SC, Ch 1, turn *Keep all ends on the back loop side R20: Skip 1 Ch, (W)3 SC, (R)9 SC, (W)1 SC, (R)9 SC, (W)3 SC, Ch 1, turn *Keep all ends on the front loop side R21: Skip 1 Ch, (W)4 SC, (R)7 SC, (W)3 SC, (R)7 SC, (W)4 SC, Ch 1, turn *Keep all ends on the back loop side R22: Skip 1 Ch, (W)5 SC, (R)5 SC, (W)5 SC, (R)5 SC, (W)5 SC, Ch1, turn *Keep all ends on the front loop side R23: Skip 1 Ch, (W)6 SC, (R)3 SC, (W)7 SC, (R)3 SC, (W)6 SC, Ch1, turn *Keep all ends on the back loop side R24-R26: Skip 1 Ch, (W)25 SC, Ch 1, turn Skip 1 Ch, (W)24 SC, 2 SC in 1 St , 24 SC, 2 SC in 1 St, 23 SC, 2 SC in 1 St, 25 SC, (change the yarn to Red) Slst into the first stitch of this row (102 SC total) Make sure to make the stitches on each corner loose. (R) Ch1, SC into each stitch (102 SC). Make sure to make the stitches on each corner loose. Slst into the first stitch of this row. (R) Ch 1, 1 SC, Ch 2, Skip 1 Ch, Slst into the back loop of the Ch ( The number 1 chain in the picture down below) that you made right after SC, 2 SC Repeat till the end of this row. Slst into the first stitch (SC) of this row. Leave the all ends in. Done!